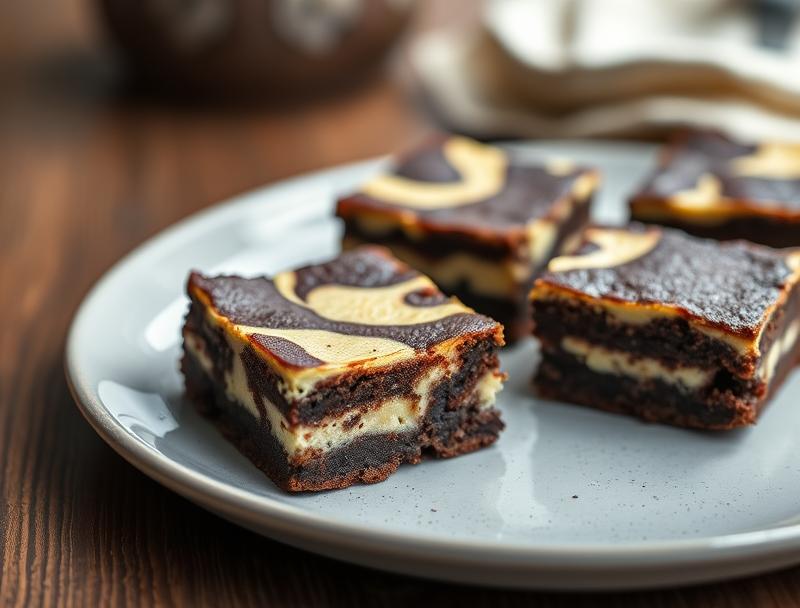
Cheesecake Brownies
Introduction
Imagine a rich, fudgy brownie, perfectly complemented by a creamy cheesecake layer, all in one divine dessert. Cheesecake brownies are the ultimate treat for anyone with a sweet tooth, and the best part is, they’re surprisingly easy to make. Using everyday ingredients, you can create a masterpiece that’s sure to impress family and friends. The combination of the dense, chocolatey brownie and the smooth, tangy cheesecake is a match made in heaven, and with a few simple steps, you can bring this heavenly dessert to your kitchen table.
Why This Works
- Flavor balance and ingredient accessibility: The key to a great cheesecake brownie is finding the perfect balance between the richness of the chocolate and the creaminess of the cheesecake. This recipe achieves that balance with easily accessible ingredients.
- Ease of preparation: Despite its impressive appearance, this dessert is relatively simple to prepare. The steps are straightforward, and the ingredients are likely already in your pantry.
- Impressive results with minimal effort: The payoff for this dessert is huge. The combination of textures and flavors will make it seem like you spent hours in the kitchen, when in reality, it’s quite quick to prepare.
Key Ingredients
The main ingredients for cheesecake brownies include high-quality dark chocolate for the brownie layer, cream cheese, eggs, and sugar for the cheesecake layer. For the brownie, you’ll also need flour, salt, and vanilla extract. Practical substitutions can be made for some ingredients, such as using milk chocolate instead of dark for a sweeter brownie, or substituting Greek yogurt for some of the cream cheese to reduce the calorie count. However, for the best flavor, it’s recommended to stick with the original ingredients as much as possible.
Instructions
- Step 1: Begin by preheating your oven to 350°F (175°C). Prepare an 8-inch square baking pan by lining it with parchment paper. Melt the chocolate and let it cool slightly. In a medium bowl, whisk together flour, salt, and vanilla extract.
- Step 2: In a large bowl, use an electric mixer to beat together the sugar and eggs until light and fluffy. Add the flour mixture and melted chocolate, mixing until just combined. Pour the batter into the prepared baking pan and smooth the top.
- Step 3: For the cheesecake layer, beat the cream cheese until smooth, then add eggs one at a time, followed by sugar and vanilla extract. Pour the cheesecake batter over the brownie layer and smooth the top. Use a knife or spatula to create a marbled effect by swirling the cheesecake and brownie batters together.
- Step 4: Bake for about 35-40 minutes or until the edges are set and the center is just slightly jiggly. Let cool completely in the pan before cutting into squares and serving.
Handy Tips
- Make sure to not overmix the batter, as this can lead to a tough brownie. Also, don’t overbake, as the cheesecake can dry out quickly. If you’re unsure, it’s better to err on the side of underbaking slightly.
Heat Control
The ideal temperature for baking cheesecake brownies is 350°F (175°C). The baking time can vary depending on your oven and the size of your pan, but as a general rule, bake for 35-40 minutes. The brownies are done when the edges are set, and the center is just slightly jiggly. Avoid overbaking, as this can cause the cheesecake to dry out.
Crunch Factor
The cheesecake brownie should have a dense, fudgy brownie layer and a smooth, creamy cheesecake layer. To achieve the right texture, make sure not to overmix the batter and avoid overbaking. If you prefer a crunchier top, you can broil the brownies for an additional minute or two after baking, watching carefully to prevent burning.
Pro Kitchen Tricks
- For a cleaner cut, refrigerate the cheesecake brownies for at least 30 minutes before slicing. Use a sharp knife and wipe it clean between cuts for the best results.
- Consider adding nuts, chocolate chips, or fruit to the cheesecake or brownie layer for added texture and flavor.
Storage Tips
- Cheesecake brownies can be stored in an airtight container in the refrigerator for up to 5 days. They can also be frozen for up to 2 months. When freezing, cut into squares first and wrap each square individually in plastic wrap or aluminum foil before placing in a freezer-safe bag.
- To reheat, simply thaw at room temperature or reheat in the microwave for a few seconds.
Gift Packaging Ideas
Cheesecake brownies make a great gift, especially when packaged nicely. Consider cutting them into bite-sized squares and placing them in a decorative tin or jar. You can also wrap individual squares in cellophane bags and tie with a ribbon for a more personalized touch. Adding a gift tag or a handwritten note can make the gift even more special.
Flavor Variations
- 🌟 Different spices: Add a pinch of cinnamon, nutmeg, or cayenne pepper to the brownie or cheesecake layer for a unique twist.
- 🌟 Creative toppings: Top your cheesecake brownies with fresh fruit, whipped cream, or caramel sauce for added flavor and texture.
- 🌟 Ingredient swaps: Use different types of chocolate, like white or milk chocolate, for the brownie layer, or substitute the cream cheese with mascarpone or ricotta for a lighter cheesecake.
Troubleshooting
- Texture problems: If your cheesecake brownies turn out too dry, it may be due to overbaking. If they’re too wet, it could be underbaking. Adjust your baking time accordingly for the next batch.
- Ingredient replacements: If you’re missing an ingredient, consider substitutions. However, keep in mind that changing ingredients can affect the final texture and flavor.
- Over/undercooking signs: Keep an eye on your cheesecake brownies while they’re baking. If the edges start to pull away from the pan and the center is just slightly jiggly, they’re done. Avoid opening the oven door too often, as this can cause the brownies to sink.
FAQs
- Can I freeze it? Yes, cheesecake brownies can be frozen for up to 2 months. Cut into squares, wrap individually, and place in a freezer-safe bag.
- Is it gluten-free? The traditional recipe includes flour, making it not gluten-free. However, you can substitute the flour with a gluten-free flour mix to make it gluten-free.
- Can I double the recipe? Yes, you can double the recipe, but keep in mind that you’ll need a larger baking pan. A 9×13 inch pan would work well for a doubled recipe.
Conclusion
Making cheesecake brownies is a fun and rewarding experience that yields a dessert that’s both decadent and impressive. With these simple steps and tips, you’ll be on your way to creating a masterpiece that will delight both kids and adults. Don’t be afraid to experiment with different flavors and ingredients to make the recipe your own. Whether you’re a seasoned baker or just starting out, cheesecake brownies are a great choice for any occasion. So go ahead, get baking, and enjoy the ooohs and ahhhs from your family and friends!
Cheesecake Brownies
A rich, fudgy brownie paired with a creamy cheesecake layer, perfect for satisfying any sweet tooth.
🥘 Ingredients
👩🍳 Instructions
-
1Preheat the oven to 350°F (175°C). Grease an 8-inch square baking pan and line with parchment paper.
-
2Melt the chocolate and let it cool slightly. In a medium bowl, whisk together flour, salt, and vanilla extract.
-
3In a large bowl, use an electric mixer to beat together the sugar and eggs until light and fluffy. Add the flour mixture and melted chocolate, mixing until just combined.
-
4Pour the batter into the prepared baking pan and smooth the top. For the cheesecake layer, beat the cream cheese until smooth, then add eggs one at a time, followed by sugar and vanilla extract.
-
5Pour the cheesecake batter over the brownie layer and smooth the top. Use a knife or spatula to create a marbled effect by swirling the cheesecake and brownie batters together.
-
6Bake for about 35-40 minutes or until the edges are set and the center is just slightly jiggly. Let cool completely in the pan before cutting into squares and serving.